Showing posts with label Lighting. Show all posts

Sunday, March 28, 2010

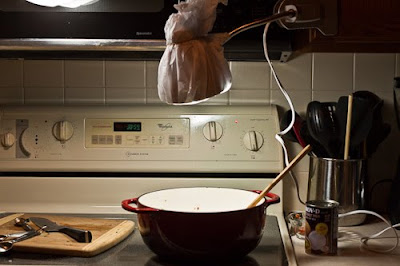
How To Soften Light With A Paper Towel

Softened Light with Paper Towel


Diffused lighting is a food blogger's best friend. You see, diffusing the light from a lamp is the key to shooting at night. Since night time shooting requires the use of a lamp, the light usually needs to be softened in order to create a natural looking atmosphere.  Harsh shadows and over-blown highlights are all problems that are prevented by diffusing light.  I've posted many techniques on how to do this, but I truly think this technique is the cheapest and easiest.

Make sure paper towel doesn't touch bulb!
All I did to diffuse the light from this $9 clamp-lamp is wrap some kitchen paper towels around the front of the lamp, holding the paper towels in place with a rubber band.  Because I am using daylight balanced fluorescent bulbs, I don't have to worry about the paper burning...fluorescent bulbs get warm, but rarely do they get HOT.   None the less, I made sure that the paper towel was far away from the bulb, just to be on the safe side.

The more layers of paper I add, the more the light will be softened.  This will make the light a bit darker, but if you're shooting with a tripod--which you should be doing anyway--this wont be a huge problem because you will be able to shoot with slower shutter speeds therefore increasing the exposure without blurring the image.
Now while this technique is not particularly green, it will save you in a pinch.  The more environmentally friendly thing to do is get an old white t-shirt that can be re-used.

Do you use something similar to soften light?  Let us all know in the comments!

Tuesday, February 23, 2010

How To Light Food With One Inexpensive Lamp


Bouncing Light For A Professional Look

Shooting for food blogs doesn't require expensive equipment.  I've posted about using inexpensive clamp lights before and today's post is about utilizing one of these clamp lights to maximize the light in your next shoot.  If available, shooting under natural light is always the best.  But sometimes the natural light isn't enough....or in this case is too much.  You see, when I was shooting this picture of lemons, the light from the window was very strong so it created harsh shadows.  I could have used a bounce card to bounce the light back onto the shadows, but even that wasn't enough.  The solution?  My trusty clamp light.  This super easy tutorial is all about where to place the lamp to achieve maximum results.


What is Bounced Light?

Bounced light is an easy technique to understand.  Pointing light from a lamp directly onto the subject creates harsh, blown-out highlights and extremely dark shadows....not good for food photography.  The goal of lighting with lamps is to diffuse the light from the lamp so that it still hits the subject, but in a softer more subdued way.  There are many expensive gadgets and do-dads you can buy to attach to your lamp to achieve this, but why bother when you can simply bounce the light?!

Bouncing the light literally means that the light is pointed at angle and it "bounces" onto the subject.  By bouncing the light, the intensity of the light softens, therefore creating more even, softer light.

The Technique

Putting this technique into practice is really simple.  In the shot of the lemons above, I simple attached my clamp light to the back of a chair that was nearby my table.  I pointed the light up at the ceiling so that the light would hit the ceiling and bounce down onto the shadow side of the lemons.  That's it!  The important thing to remember is that this light will only fill in the shadows...I'm not relying on it as my main light source...that's what the window is for!  See the images below for more details:


Without Bounced Light


With Bounced Light


Have you used a similar technique?  If so, please add your photo to the link list below and share!

If you're adding a link, please make sure to add your blog's name and the title of the post in the first dialogue box.  I can't wait to see what you all come up with!


Wednesday, October 28, 2009

How To Set-Up Lights For Easy Night Time Shooting

Easy and Inexpensive Lighting Set-Up

Fluorescent Daylight balanced bulbs have recently become my new favorite type of light. I obviously still prefer to shoot under natural light, but like I mentioned in the previous post, my cooking and shooting time doesn't always correspond to the whims of the sun.

Shooting at night requires buying a lighting system, but purchasing lights doesn't have to bankrupt your budget. A few clip lamps, daylight balanced light bulbs, and tissue paper is all you need to take gorgeous shots any time of day!

Karen of The Eclectic Cook sent me images of her lighting set up to share with all of you. The images below are really helpful in visualizing how to set-up your lights


A few things to notice about Karen's lighting set up is that she uses a very small space and places the lights, one on each side, coming from above. Second, she covers the light with layers of white tissue paper to diffuse the light. THIS IS CRUCIAL! The tissue paper helps to soften the light creating even lighting conditions.
And last, all of the "equipment" is really inexpensive. For around $15 bucks and a trip to Home Depot or Lowe's you could have a very versatile lighting system.

Also note that Karen uses two locations for her shoots. One for shooting the ingredients, and another for shooting the "final product". She uses colored poster board to make a background and shoots her final dish on that.

Make sure to visit Karen's site and see the fabulous recipe for Thai Curry and Coconut Butternut Squash Soup from which these images come from. Thanks for sharing Karen!


bulbs
shoot at night
daylight balanced bulbs
night time lighitng


Tuesday, October 20, 2009

Shoot At Night WITHOUT Expensive Lighting Equipment


4 Easy Tips For Shooting Food At Night

I think it's pretty common for us food bloggers to photograph and blog about the meals that we eat on a day to day basis. Unlike a professional food stylist, I don't make a separate plate JUST for the purposes of photographing it. In the past I've tried this very technique, but it never really ends up working out. Besides, now that my teaching job has started again, the only time I have to photograph is at night...so saving an extra plate really didn't matter much because shooting at night was always so impossible.

I think many of us run into this problem. One of the most important aspects of food photography is the lighting. Every post you read about improving your food photos will tell you to use natural light, but what if dinner time is the only time you have to cook AND photograph? What then? There are lots of expensive options out there, but as soon as I started researching for my own solution I quickly realized there was a really cheap solution to this problem. The photograph above is a testament that it can be done...this shot was taken at 10:30pm and I only spent about $20 dollars total for the "equipment". Find out how in the second part of post...


Daylight Balanced Fluorescent Bulbs

Daylight balanced bulbs are the KEY component in this lighting set-up. These bulbs replicate the neutral color quality of daylight so your photos wont have an ugly yellow tint to them. I bought 120w bulbs from Home Depot and also bought two clamp lights. Clamp lights are lighting sockets that have a clamp at the end. This is extremely helpful because the lamp can be clamped to almost anything for perfect placement. Below is a picture of one.


Diffuse The Light

Diffusing the light is really, super important in shooting at night. The direct light from the bulb will create harsh shadows that will look un-natural and harsh.

Never, ever, ever point the light directly at the food! This will create harsh shadows and highlights. Instead, point the light AWAY from the food, but place a piece of white board in front of the light (facing the food). This will then "bounce" the light back toward the food, but in a much softer, glowing manner. You might have to play with the placement of the light and with the placement of the board (a white foam presentation board works great for this). The photo below shows a similar set up, only here its set up as a box...ignore that for now and just concentrate on how the light is pointed away from the object but toward a white wall...again, light will bounce from the wall toward the object.


Place One Light High, and One Light Low

One light should be placed high and slightly to the right of the food...in essence you are trying to recreate the sun. we call this the "main light". The second light should be placed low and to the left of the food. This light is called "the fill light" because it is meant to "fill" in the shadow areas caused by the main light. The fill light is always slightly dimmer than the main light, so I simply use a lamp with a shade on it as my fill light. The shade diffuses the light and creates a nice, even glow.

Use A Tripod!

This is probably the only "expensive" equipment you need. There really is no way around it. Even with a 120w bulb, the amount of light these bulbs produce is small so large apertures and slow shutter speeds are needed to fully expose the image. A tripod will allow you to shoot with slow shutters without causing blur. A tripod is a must for night time shooting so if you don't have one you could try this little trick:

Take a gallon size ziploc bag and fill it with sand. Place a chair or stool in front of your food and put the bag of sand on the chair. Next, place your camera on the bag and nestle the camera into the sand. The sand will act as a firm cushion and will hold the camera in place.


There are lots of hacks out there for making your own softbox set-ups but those all seemed way to complicated for me. How do you shoot at night? I'd love to hear about other peoples solutions to this problem!

Wednesday, August 12, 2009

How To Harness The Power Of Diffused Lighting

diffused light

Difference Between Directional and Diffused Light

An often blogged about food photography tip is to shoot with natural lighting. And I agree. There is no way around it....natural light will ALWAYS give you better results. What is less often talked about is the difference between directional and diffused light. It really is simple, yet harnessing the power of diffused light is one of the major ways to give your photographs a professional polish.


Diffused Lighting

When most people talk about using natural light they are referring of course to the sun. "Shoot next to a window!", "Even outdoors!" they say, yet shooting with the sun as your light source presents a particular set of problems.

On a clear, bright day, the sun is producing directional light. Directional light is usually not very good for food photographs. You see, directional light is light that is traveling directly from the source to the subject. This type of light creates over-blown highlights and harsh shadows....not very appealing when photographing food!

Diffused lighting is light that is hitting the subject from MANY directions, producing a softer, more even light. The image above comes from Wrightfood.com In this great post, Matt writes about his shooting set-up, and includes this example of the difference between directional and diffused lighting. The image on the left is directional light...notice the harsh shadows and blown-out highlights?

The image on the right uses diffused lighting and is much more pleasant and powerful. The light is even, soft, and shows off the subject much better than the directional light.

How To Make Diffused Light

So how do you diffuse light? Simple. Place any shear or semi-transparent material in between the light source and your subject. A shear, white curtain works great. Many people buy drawing vellum at the art supply store and tape it up to their window. I particularly like Still Life With's tip to use regular old tissue paper to diffuse light.


The key idea here is to avoid placing your plate of food in direct light or to diffuse the light to soften it. One word of caution: Diffusing the light will decrease the intensity or brightness, so adjust camera setting accordingly.

Got nothing to diffuse with? Try placing the plate in a shadowy area. I shoot during the day, next to a window, but place my food in the shadow part of the table. Works great every time.

Any of you have any diffusing tips? What materials do you use to diffuse light? Would love to hear about it in the comments.

Wednesday, April 22, 2009

Make Your Own Light Box For Night Time Food Shooting

make your own soft box
If you're like me, much of my cooking is done at night, after a long day of work. This can present problems for photographing food. Often times I'll cook something really delicious for dinner but wont post it on my blog because I wasn't able to get a decent shot of it.

Natural lighting is always best, but I've recently been investigating making my own light box to alleviate this problem. A light box is simple really: A box with lamps on the outside of it that are shining through shear fabric so the light is diffused and soft. Professional soft-boxes are a really expensive, but luckily I found this great tutorial on Digital Photography School that shows you how to make one with really inexpensive materials! Check it out!

Oh, and if any of you have suggestions for shooting your culinary creations at night PLEASE let me know in the comments!

Make Your Own Inexpensive Light Box - Digital Photography School


UPDATE: Kate over at Savour Fare linked a version of a table-top lighting setup which looks absolutely fantastic. Check it out and thanks Kate!

Sunday, April 5, 2009

Light Your Food Photos Like A Pro - Use A Reflector


Using a reflector is one of the easiest yet most significant things you can do to improve the lighting of your food photographs. A strong light source can cause harsh shadows to fall on your food which usually translates into poor images. A reflector can fix that situation by bouncing light onto the shadow side and adding an overall brightness to the image.

How to use a reflector in second part of post...

What Is A Reflector?

A reflector is any rigid form used to bounce light onto the shadow side of the subject. I use a small, store bought reflector that folds up into a small compact shape. It's made out of fabric over a rigid frame with one side white and the other side a metallic silver. The white gives me a softer brightness while the silver gives me bright, punchy light.

You can make your own by taking a piece of white foamboard and covering one side with aluminum foil.

Placement Is Key


The placement of the reflector is the most important consideration. The reflector should be placed OPPOSITE of the main light source. In the photo above, the window is the light source, so the reflector is placed to the right of the bowl of lemons, FACING the window. This will cause the light to bounce from the reflector back onto the lemons. As you can see in the photo, I use two jars of jam to hold the reflector up. No fancy equipment needed!

Here is a before and after