Photoshop Adjustment Layers Save Time, Offer More Control
Non-Destructive image editing is the professional method of correcting images in Photoshop. In earlier versions of photoshop and in less-powerful image editing software, pixels are directly edited thereby irreversibly altering their structure. The problem with this type of editing is that when mistakes are made, you are forced to revert back and start from scratch, wasting all of your precious editing work and time!
Non-Destructive image editing however, doesn't immediately alter the pixels allowing you to return to your correction whenever you want, as many times as you want. Mistakes are easily corrected and because the editing is done on a separate layer, layer masks can be used for even more control and power! This tutorial is a bit more advanced than others I've posted, but not by much. Check it out
Add Adjustment Layer
An adjustment layer is an editing command that is added as a separate layer. Open your Layer Palette and at the bottom find a button that is half white and half black. Click that button and a new menu will pop up. At this point you have many options. All of these options allow you to edit the image in a number of ways. The ones I use the most are Levels, Curves, and Hue Saturation. Play around with others, but if you're trying to do basic image corrections like exposure and color correction, then the three I mentioned are all you need.
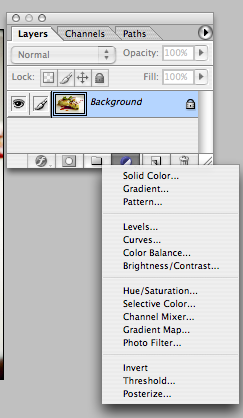
I use Levels to correct exposure. You can check out this "how to correct exposure" post I wrote a while back to see how to use this command. I also use Curves to fine tune the exposure...curves is a bit complicated for this post, but if any of you are dying to learn it, let me know in the comments and I'll whip up a post about it. Hue/Saturation is used to correct for color imbalances and to increase saturation. See this easy tutorial on how to use the Hue/Saturation command if you're interested in learning it.
Adjust Edit Whenever You Want
Here is where this command really comes in handy. Let's say you went a little too far with the saturation command and now your photo of tomatoes looks nuclear and neon. Because you haven't altered the pixels, all you need to do is double click the adjustment layer and the dialogue menu re-appears and allows you to further correct your edit. Brilliant!
Add Power To Your Corrections
Because adjustment layers are added as separate layers you can add masks to them to control where the correction is added. Another previous post I wrote on Burning & Dodging Using Adjustment Layers is a good starter if you haven't ventured in to the world of masks. Masks seem to be one of the toughest tools for photoshop newbies to master, so be patient with this one. In essence, when adding a mask you use black to hide parts of the adjustment layer, and the color white reveals the full effects of the correction. The only reason you can add a mask to your adjustment is because you've added it as a separate layer. Had you made your adjustment directly to your pixel, you wouldn't be able to control where the adjustment was visible, thereby denying you control.
When Done, Flatten All Layers
When your corrections are all done, the last thing you need to do is flatten all the layers. Photoshop waits until this point to actually alter the pixels. In essence, an adjustment layer gives you a PREVIEW of what the correction will look like. When you flatten the layers, photoshop applies the corrections and alters the pixels. After flattening the layers you cannot return to the adjustment layers without backtracking on your history palette. This should be the very last step you do before saving your file.
I always make it a habit to save a file with adjustment layers intact, flatten the image, then save the final. This way if months later I decide to alter the image I can return to my file that contains my adjustments layers and not have to start all over.
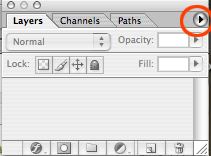
To flatten the layers go to your Layers Palette window and on the top right find a little triangle (pictured below) click that and a new menu pops up. Select flatten image and you're done!
Adjust Edit Whenever You Want
Here is where this command really comes in handy. Let's say you went a little too far with the saturation command and now your photo of tomatoes looks nuclear and neon. Because you haven't altered the pixels, all you need to do is double click the adjustment layer and the dialogue menu re-appears and allows you to further correct your edit. Brilliant!
Add Power To Your Corrections
Because adjustment layers are added as separate layers you can add masks to them to control where the correction is added. Another previous post I wrote on Burning & Dodging Using Adjustment Layers is a good starter if you haven't ventured in to the world of masks. Masks seem to be one of the toughest tools for photoshop newbies to master, so be patient with this one. In essence, when adding a mask you use black to hide parts of the adjustment layer, and the color white reveals the full effects of the correction. The only reason you can add a mask to your adjustment is because you've added it as a separate layer. Had you made your adjustment directly to your pixel, you wouldn't be able to control where the adjustment was visible, thereby denying you control.
When Done, Flatten All Layers
When your corrections are all done, the last thing you need to do is flatten all the layers. Photoshop waits until this point to actually alter the pixels. In essence, an adjustment layer gives you a PREVIEW of what the correction will look like. When you flatten the layers, photoshop applies the corrections and alters the pixels. After flattening the layers you cannot return to the adjustment layers without backtracking on your history palette. This should be the very last step you do before saving your file.
I always make it a habit to save a file with adjustment layers intact, flatten the image, then save the final. This way if months later I decide to alter the image I can return to my file that contains my adjustments layers and not have to start all over.
To flatten the layers go to your Layers Palette window and on the top right find a little triangle (pictured below) click that and a new menu pops up. Select flatten image and you're done!
I know using adjustment layers might seem like a lot of work, but ultimately they can save you countless hours and add powerful controls you otherwise wouldn't have. Do you use non-destructive image editing in your workflow? Have any questions about layers and masks? Leave me a comment and I'll get back to you.
Nice! I'd love a curves tutorial, as well as one on the basics of masks (in addition to the other post you already wrote about it). :)
ReplyDeleteGreat Stephanie...I'll work on those and publish as soon as I can!
ReplyDeleteDanny,
ReplyDeleteBrilliant, brilliant, brilliant. I just spent the last two hours gobbling up everything. I event printed out all your articles on digital photography and driving traffic and now have my "Danny Binder" with all of the great tips included.
Your site is one of the most informative, useful, and practical collections of resources I have found in a long time.
Your posts also led me to other great sites. I would love to take a class with you. Love my new digital Nikon D60 but still can't figure out all the bells and whistles, even after taking a seminar.
BTW, I went to add my blog to your blog roll and got this message: foodbloggersunite.com/2000/03/join-our-blog-roll.html
Would you be willing to consider adding me to the list. My blog's name is Delicious Prose and the url is http://deliciousprose.net
Thanks bunches and best regards,
Summer, the Food and Wine Diva
Thanks Summer! I'm glad you found my site helpful...I've added your blog to my blog roll.
ReplyDeleteI'm teaching a seminar at Camp Blog Away this coming Summer! Make your way over to Cali for food blog camp!